Showing posts with label China Glaze. Show all posts

Thursday, May 2, 2013

There's No Place Like Home!

I'm super proud of these nails, guys. It was actually quite easy and I love how they turned out.
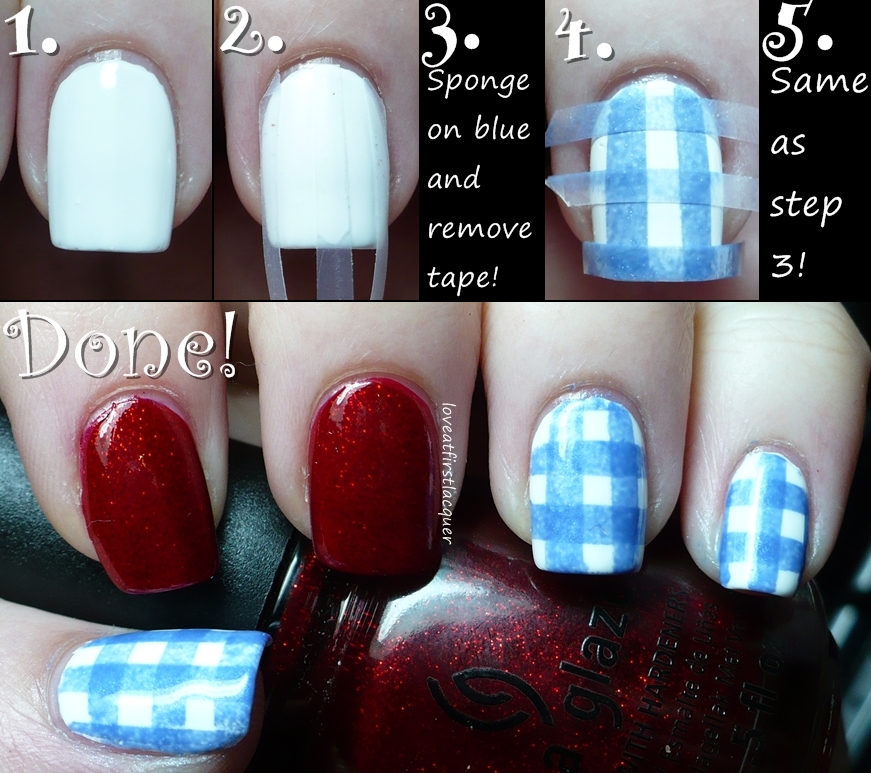
Dorothy Nails! I've been wanting to try Gingham print for a while but all of the ones I looked at weren't neat enough for me (it bugs me when the lines aren't straight. Does that make me anal retentive?). So I used tape and sponge!


By sponging on one layer of the blue color, it makes it a little less opaque than just the pure color from the brush. Then when you sponge on the next layer after applying the perpendicular tape, it makes the perfect gingham squares!

The red I used is China Glaze Ruby Pumps (because, duh. You have to). The white is Zoya Purity and the blue is Zoya Jo.

Tutorial!


Yay! I hope you like these as much as I do. Like I said, super easy!! Even if you just did the gingham it would be adorable in any color.

Thanks for reading!

Thursday, March 14, 2013

St. Patrick's Water Marble

Yup. It's been a while. I keep going back and forth on whether I want to move my blog here or not. It seems like most of the big-name blogs are on Blogger, and the interface is easier to work with for me. It's probably better to do it now than later.

Okay, I've decided. Welcome to my Blogger Blog!

Here's my second ever water marble for St. Paddy's! (Click any pic to embiggen)

The thumbs are clovers!


Yay! So I think I solved my water issue. I'm using room temperature distilled water and the polish is spreading beautifully. Yeah I have to buy it by the gallon, but I'm just using a little at a time and it's worth it to have more detailed marbles.


|The polishes used here are a-england St. George (dark teal) and CG Running in Circles (emerald glitter). I've discovered that the a-england polishes spread REALLY well but marbling uses so much polish that I don't think I'll use them again. a-england is too expensive and beautiful to waste.

I'm really happy with these. I wanted to do clovers on all of my nails but it was surprisingly difficult to get the clovers small enough to fit on my thumbs, much less my teeny tiny pinky nails.

Well, I hope that these pictures count as a decent come back. Tonight I'm going to see Flogging Molly in concert and I'm SUPER EXCITED! They will surely get me in the mood for green beer.

Thanks for reading!

Thursday, February 28, 2013

Interlocking Dots! (Plus Picture Tutorial)

Originally Posted: February 5, 2013

So on Wednesday, my high school choir director friend has asked me and another friend to come to one of his classes and teach Erato’s “Call Your Girlfriend” to his women’s choir. This same director-friend has apparently told some of his students that I do nails. Which, of course, means I have to have cool nails when I go there. And my last mani started chipping today. So I’m staying up all late just to make sure I have awesome nails so I don’t let anyone down. I hope you’re happy, director-friend!

SO! Here we have China Glaze Pink Voltage and Zoya Raven making an appearance on my little nails:


I also made a step by step picture tutorial!

Materials:

Two contrasting colors that are fairly opaque

Dotting tool. Or a bobby pin. Or the back of a paint brush. or any smallish tipped tool you might have around. I wouldn’t use a toothpick cause that will make super tiny dots.

Top Coat


The only step left out is the topcoat at the end… but I wasn’t sure how to make that obvious in a final photo. So I’m telling you now. Step 7: top coat that bizniz. Also, in case it wasn’t clear, the initial diagonal line in step 2 does NOT need to be perfect. It will get covered up by the dots.

Okay, and now it’s entirely too far past my bedtime. Thanks for reading!

PS: If you’re looking for a freaking neon pink, this one is amazing. It’s coming off as slightly more baby pink in these pictures, but trust me, it will make your eyes bleed with happiness.

Okay. Goodnight.
Blogging tips