Showing posts with label Tutorial. Show all posts

Thursday, May 9, 2013

Face It Check Check Nail Kit (Aka: first thing I've ever ordered from Korea) Picture Heavy!

(All pictures embiggen)

STORY TIME!

So about a month ago, I came across this very cool nail polish kit.

In this kit, came 3 jelly polishes:


This kit also came with instructions on the back, which may have been more useful if I could read Korean: 


But thanks to graduating Kindergarten, I was able to follow the pictures! 


And I lived happily ever after! 
____________________________

So yeah. This is a fun kit. I ended up using striping tape for the white line, which I think was a good and bad decision. Good: the white line is straight and awesome. Bad: it makes it more painfully obvious how bad I am at free handing straight lines.

Here be a tutorial: 


By the time I had figured out how I was going to accomplish this mani and taken all the pictures along the way, it was late and I was tired. So I thought, "What if I use a sponge for the lines, like I would a gradient, only don't mix the colors?"

You can say it. I'm a genius. 
Quite a different look, but significantly faster. I think it looks... vaguely watercolored? I like it a lot. Possibly more than the original, but that might be because it looks neater. The sponge looked like this:


Both of these looks could very likely be done with any jelly polishes, but this kit was only ten bucks, $13 with shipping, and I didn't have any jelly polishes in these colors. 

If you're interested in buying the kit, I got mine here. They also sent me a whole bunch of beauty samples AND a personalized thank you note, which was unexpected and pretty rad. 

Anywho, I hope you are all doing well! It's finally getting warm here and I'm excited! 

Thanks for reading! 

Tuesday, April 9, 2013

She Wear the Chuck Chuck Taylors...

...Just like her feet been tailored? Not exactly imaginative.

So I searched for songs that talked about Chuck Taylors and each song was equally ridiculous. Or awful. Oh well.

Anywho, NEW POST! YAY! I'm still alive! I have no excuses, I just haven't posted. I'm sorry. I did go to Seattle for a weekend which was a ton of fun. The weather could not have been more perfect.

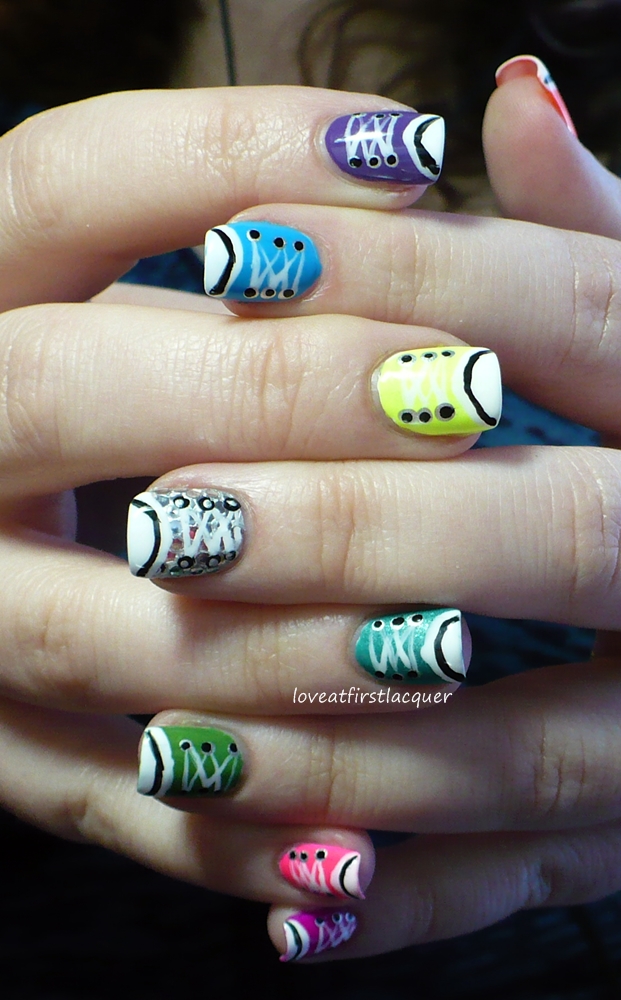
So I've had at least 4 people show me this picture and tell me I should try it. And because I'm a people pleaser, I did. Here's the result:
I can't free hand to save my life
Not TERRIBLE, and it's fun for a couple days. I think it looks better in person. Here are some close ups, click to embiggen as always:


I actually have a nail stamp of laces, but I wanted to do a tutorial that everyone could do even if they didn't have stamping equipment. Sorry I'm terrible at straight lines. FYI, you could use a black sharpie for the black line. It would probably be easier than using nail polish. I didn't think of it until I was done.

Tutorial!


I hope this was worth the wait. I'm not positive it was... but I hope so!

Thanks for reading, as always!!

Tuesday, March 26, 2013

What an Ordeal.

Oh, this manicure. So I did this about an hour before I had to leave for a bridesmaid dress fitting. I threw on some seche vite and thought all would be fine.


Aw, it's so pretty. 
Surely, nothing can go wrong! 

Turns out, even Seche Vite couldn't help me. The ends were just too thick. By the end of the fitting my nails were a MESS. I had to go to work right after, so there was nothing I could do, but the polish was still wet enough that I could kind of scrape it off. Which, because I'm one of those people that can't leave things alone, I of course did.

The cherry on top was I broke two of my nails at work, so now I've filed them all down super short. But hey! I redid this mani on my new little shorties.


At least it still looks cute on short nails. Even if the shape is all messed up on my middle finger. How appropriate that I was gonna call this the "silver lining manicure."

Anywho, Tutorial! I made this when I was clearly too tired to be making things and forgot to place the 2. in the corner of the picture before I saved it. So, ya know.. Good Job, Coralee.

Oh, btw: Colors are Zoya Blu, a-england excalibur, and Zoya Purity.

Thanks for reading as always :)

Thursday, February 28, 2013

Interlocking Dots! (Plus Picture Tutorial)

Originally Posted: February 5, 2013

So on Wednesday, my high school choir director friend has asked me and another friend to come to one of his classes and teach Erato’s “Call Your Girlfriend” to his women’s choir. This same director-friend has apparently told some of his students that I do nails. Which, of course, means I have to have cool nails when I go there. And my last mani started chipping today. So I’m staying up all late just to make sure I have awesome nails so I don’t let anyone down. I hope you’re happy, director-friend!

SO! Here we have China Glaze Pink Voltage and Zoya Raven making an appearance on my little nails:


I also made a step by step picture tutorial!

Materials:

Two contrasting colors that are fairly opaque

Dotting tool. Or a bobby pin. Or the back of a paint brush. or any smallish tipped tool you might have around. I wouldn’t use a toothpick cause that will make super tiny dots.

Top Coat


The only step left out is the topcoat at the end… but I wasn’t sure how to make that obvious in a final photo. So I’m telling you now. Step 7: top coat that bizniz. Also, in case it wasn’t clear, the initial diagonal line in step 2 does NOT need to be perfect. It will get covered up by the dots.

Okay, and now it’s entirely too far past my bedtime. Thanks for reading!

PS: If you’re looking for a freaking neon pink, this one is amazing. It’s coming off as slightly more baby pink in these pictures, but trust me, it will make your eyes bleed with happiness.

Okay. Goodnight.
Blogging tips